.png)
How do I Fill Out the Personalization Page?
The Personalization tab is used to customize your reservation landing page. This page will be guests’ first impression and what they will use to make an online reservation with your campground. By going to reserve.campgroundbooking.com and searching your property in the search box (pictured below) you’ll be able to take a look at what your reservation page looks like.
Note: As you’re filling out the Personalization tab, it can be helpful to occasionally save and navigate to your reservation page to see it come to life. Some things such as photos will be held in cache to help with performance so those may take longer to update on your view.

Getting Started: To begin making edits to the Personalization tab, first you’ll click on your campground name in the upper left corner to get into the Settings, then scroll down to “Personalization” and select it.

Photos
After you’ve clicked into the Personalization settings, the first section will be photos. The Photos section is where you can upload different photos that you feel best represent your campground. Each of the four types of photo uploads has a different purpose and populates onto a different area of your reservation page.
Property Logo - This is where you will upload your property logo. This field will only allow for one photo as a property logo; if you would like to change your logo, simply upload a new photo over the currently saved one. The image below illustrates where this logo will show itself on the reservation page.

Property Map - This field is where you will upload a property map - there is only one allowed image in this field. The property map will be viewable when guests are in the process of reserving online. It will be a clickable link in the upper right-hand corner of the site search page (illustrated below).

Site Icon - This field is where you will upload your personal site icon. This will be displayed on the left side of your reservation landing page tab, illustrated below. Only one image is allowed within this field.
Campground Images - This field is where you will upload images of your campground. These will show as the main banner of your reservation page and will be the first impression a guest has of your campground. We recommend using the images that best represent all that your campground has to offer. The image below illustrates where on the reservation landing page the images will show up. We recommend at most 10 images in this field.

Note: The order of the images in the settings, will be the same order of the images on the reservation page. (Illustrated below)

General Information
The General Information section is used to give guests a quick overview of the campground. The rates listed here can be shown as the specific site-type rates or as a range. The image below illustrates how the General Information is shown on the reserve page and what might be listed in each field.
Note: This is an important field as it will contribute to the guest’s first impression of your campground and quickly show them that you have the accommodations they’re looking for.

This image shows the empty General Information fields as seen in the Personalization tab in the Settings.

Total Sites - Enter the total number of sites (all sites: full service, no service, tent, RV, etc.)
Seasonal Sites - Enter the total number of seasonal sites available for booking or leave blank if none.
Max RV Length - Enter the maximum RV length (in feet) that you’re able to accommodate.
# of Full Hookup Sites - Enter the total number of full hookup sites available for booking or leave blank if none.
Note: A full hookup site is defined as a site with water, sewage, and electrical available.
# of Electric/Water Sites - Enter the total number of site with Electric and Water only or leave blank if none.
# of Electric Only Sites - Enter the total number of sites with electric only or leave blank if none.
Camping Rates for Listing - In this field, you can either list the specific rates you offer or you can list a range of rates. For example, “Nightly rates range from $30-$80” or “Tent Sites: $30/night; Electric and Water Sites: $60/night; Full Hookup Sites: $80/night”
Lodging Rates for Listing - In this field, you will list the lodging rates available for booking. Similar to the camping rates, you can either list the specific rates or a rate range. Lodging refers to cabins or other such accommodations that someone can book to stay at. Leave blank if you have none.
Render Options
Site Map Zoom - The Site Map Zoom controls the zoom of the interactive map, available if you allow for guests to book by individual sites online. The default here is 17 with the larger the number zooming further out and the smaller the number zooming in closer.
Include Name - Obsolete
Hide Policies - Checking this box will hide the policies from your reservation listing. If left unchecked, policies are listed at the bottom of the listings page.
Note: The policies will still be available to view and required to accept at check out. They will also still show up on the confirmation email if that option is checked.
Stretch Logo to Full Width - Obsolete
Turn Off Demo Reports? - While still in the onboarding process, demo reports will be turned on. This allows you to see example data in the reports before the campground has collected its own data for the reports to use. Once you have reservations uploaded, this box is checked so you can see your own data.
Email Options
Hide Site on Confirmation Email? - When checked, this will hide the individual site chosen or assigned on the confirmation email. Select this if you do not want your guests to see the assigned site in their email confirmation..
Include Privacy Policy in Confirmation Email? - When checked the Privacy Policy will be shown in the confirmation email.
Include Cancellation Policy in Confirmation Email? - When checked the Cancellation Policy will be shown in the confirmation email. It is beneficial to have a reminder of your policy to help with any questions.
Include General Policy in Confirmation Email?- When checked the General Policy will be shown in the Confirmation Email.
Policies
In the following text boxes, you will list your different policies. These can be viewable on you reservation listing page and on the confirmation email as detailed above based on settings. They must be agreed to by the guest before they’re able to complete their online reservation. You’re able to change a policy at any time by updating the text and saving.
Privacy Policy - This tells your guests how and why you're collecting their information. It spells out how you use that data, why you use it, and if it's shared with others.
Cancellation Policy - Enter in your cancellation policy. This can be as detailed or simple as you prefer. This should always be included so your guests know what to expect if they have to cancel. Things such as how much notice to provide, where to contact to cancel and any fees they may incur.
General Policies - Enter any general policies that you enforce on the campground. This can be campground rules, travel guidelines, prohibited items, or anything else you want the guests to agree to before staying at the campground.
Terms for Email and Print
This section configures the "Receipt with Terms" option available on Reservations. These are only viewable in the management side and not shown to guests when booking online. You are able to view and print these out for your guests to sign when they arrive or save as a PDF and email to a guest.
Welcome Message - Enter text you want displayed in the body of the Terms page. There is an option to include General Policies so keep that in mind when entering text. Note that there is also a "Welcome Message" option on individual Site Types that would override what is entered here in case you want to state something different. A good example where this occurs is when you have mostly RV lots but also have a few cabins. You can enter the welcome message for RV lots in Personalization and then in your Cabin Site Type, set a message specific to cabins as they usually have slightly different rules.
Indemnity Message - Enter any policies you have as far as protecting your campground or guests against liability and/or financial lose.
Waiver Message - Enter in a waiver message so that the guest will understand that they are signing acknowledgement of the form and its policies. See example screen shot below directly above the signature box in all caps.
Signature Line - This text box allows you to change the signature line on the terms and conditions waiver. For example, if you put “Guest Signature” into this box, it will show as the image below.

Hide Privacy Policy? - Check to hide the privacy policy on the Receipt with Terms form.
Hide General Policy? - Check to hide the general policy on the Receipt with Terms form.
Show Tax? - If checked the total taxes are shown on the top of the Receipt with Terms form.
Split Tax? - If checked the taxes are broken down by by type on the top of the Receipt with Terms form.
Trust Stamps - This is where you can upload icons that indicate different memberships and associations you’re a part of that will help guests trust to stay with you.
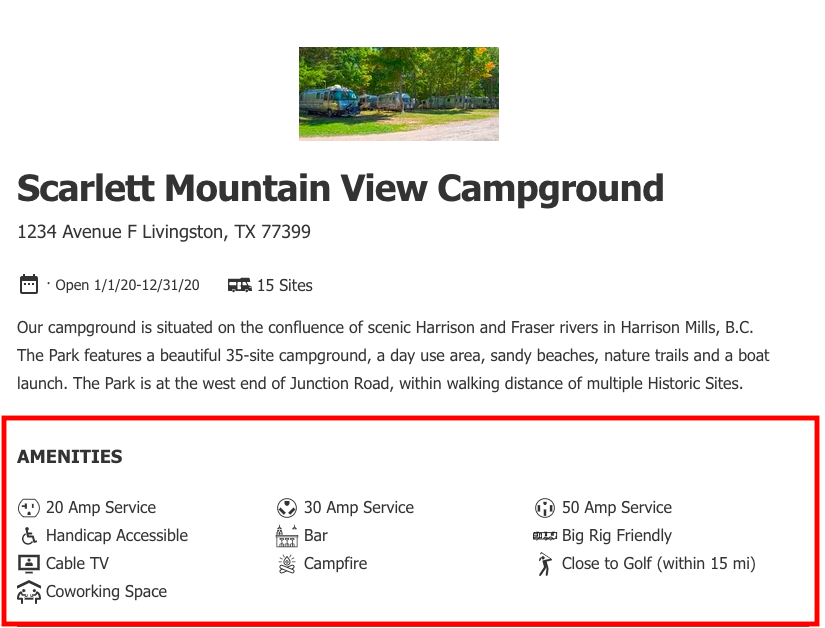
Amenities
The Amenities section allows you to search through the listed amenities and their icons and select the ones that apply to your property. This feature is meant to give the guest an idea of some of the great things your campground offers by looking directly at the reservation listing page. You can add amenities by searching directly in the text box (shown below) or by starting to type a word and scrolling through the drop-down list.

The image below illustrates where on the reservation page the amenities selected will populate:
If you have any questions about setting up or updating your Personalization settings, please be sure to reach out to us here at [email protected] and we will be happy to help!