.png)
Legacy - Metering - What is it and how does it work?
The Metering feature is used to track the usage of different amenities - electric, water, etc. - and add a charge to the guest based on the campground’s preferred unit of measurement - gallons, liters, KW, kwh, etc.
Why we created this feature: We created the metering feature in an effort to move towards having all of the tools necessary for a campground or RV park to fully manage their property using solely this system - long-term and short-term guests included. For short term guests, a lot of properties will simply include the cost of electricity and water into the initial reservation fee; however with long-term guests, it often makes more sense to calculate the usage and add it as an item on the reservation invoice - this feature provides the ability to do that.
Getting Started: First you will create an inventory item for the amenity you would like to calculate and charge for. To do this, you will click on the “Inventory” tab on the left side of the screen - it will be the last tab below “Dashboard”.
Note: To learn more about setting up inventory items, click here.

Once in the Inventory tab, you will select the orange button in the upper right corner labeled “+ Add Inventory Item”.

Selecting this button will bring up the following window:

In the photo below, you will see a general example of how to set up a metered item - in this case water usage. You will want to select a name, tax rate (if applicable), and description. Once you have done that, you will then check the “Metered on Sites?” checkbox, which will bring up a text box to the right. In this text box you will name the unit of measurement that you intend to charge for - gallons, liters, KW, kwh, etc. In this example, we are going to set the units to Gallons. Now that you have set your unit, you will want to add in the price per unit; to do this, select the orange “+” indicated in the photo below.

The popup window is illustrated in the image below. This is where you will set your price per unit. In our example, we’re setting a meter charge for water by the gallon and we will be charging $0.50 per gallon of water used. Once you have added in the price you plan to charge per unit, along with the charge name, select “Save”.

Once saved, the Inventory Item window should look similar to the image below with the “variation” saved at the bottom. If the name and description are set, the “Metered on site?” checked, units defined, and cost per unit set, then press save. You have now set your inventory item up for metering.

Setting the initial meter reading:
Now that you have created the metered inventory item, whether it’s for water or power, next you will want to update each individual site’s reading to match the physical meter’s reading. For example, if Site 4’s water meter has a reading of 543 Gallons, then in the CampgroundBooking system you will want to set Site 4’s water meter to 543 Gallons. After this is set, you will then update the meter in the system whenever the billing period for your guest comes around. This process will be illustrated further below.
Getting Started: First, you will navigate to the “Sites” tab which will be the second tab from the bottom on the left side of your screen - shown in the image below.

Once in the Sites tab, you will then start by locating the first site that you would like to update the meter reading of. As you locate the site, click the three vertical dots on the right side of the site and select “Set Meter”.

Once you’ve selected “Set Meter(s)” the following window will appear:

In this window you will set the initial reading for your meter. If there is a guest checked into the site you’re updating and you have yet to charge them for their usage, you will want to initially update the meter to the reading it had before their arrival, then add in the current reading and choose “Add NaN KW/Gallons to Reservation #xxxxx”.
For example, if the meter reads 540 gallons when the guest first arrived, but is now at 554 gallons, the best method would be to type 540 into the meter for Water, select “Update Reading” then enter in 554 into the meter for water and select “Add 14 Gallons to Reservation #xxxxx”. (Shown in the two images below)
Note: If you enter a Gallon or KW amount that includes the guest’s usage, but don’t add it to the guest’s reservation you will not be able to undo that update and the guest will not be charged for the amount they’ve used.


Adding the 14 gallons (shown above) to the reservation will update the reading as well, but updating the reading will not automatically add the gallons to the guest’s reservation invoice.
Updating a reading from the Dashboard:
Once all of the individual site’s initial meter readings have been set, you will then have the option to update a guest’s reading directly from the reservation dashboard.
Note: The guest must be checked in for this feature to be available on their reservation.
First, navigate to the dashboard and locate the reservation in question. Once you have located the reservation, hover over the “i” on the right side of the reservation and select the “Set Meter” icon - shown below.

Selecting the “Set Meter(s)” icon will then pull up a similar window to the one shown below. You’ll notice that the meter readings that have been initially set will come with that number already populated into their reading.

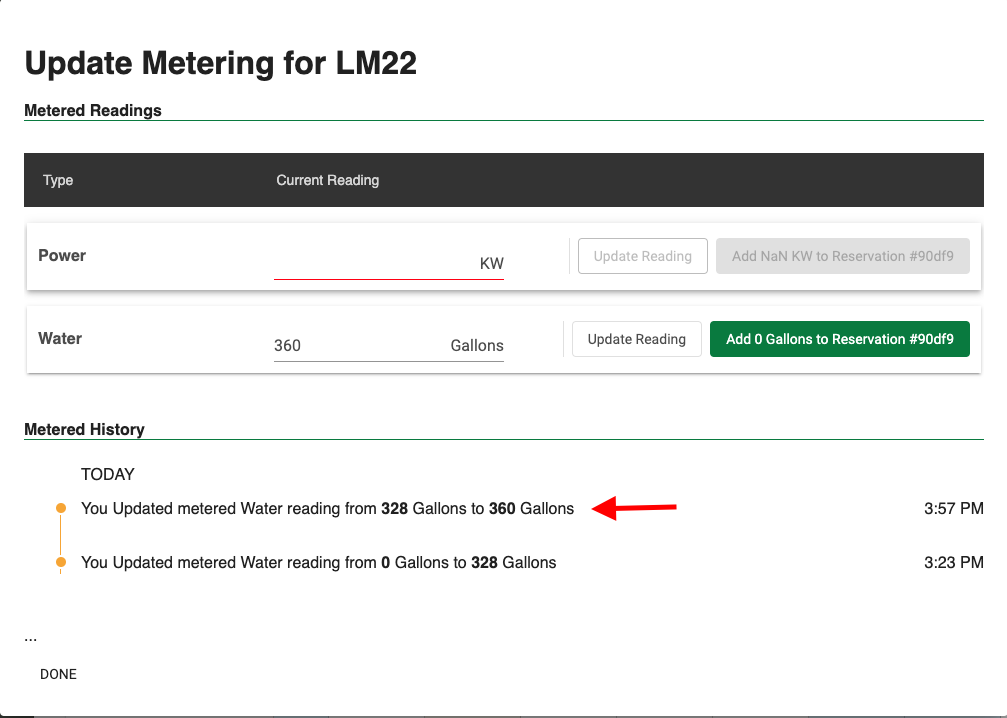
To update this reading and add it to the reservation, enter in the new reading and select “Add X Gallons to Reservation #XXXXX” as shown below:

Selecting “Add 32 Gallons to Reservation #90df9” will also update the meter’s reading and the Metered History, shown below.
Now the site’s meter has been updated and added to the guest’s reservation invoice at the amount set in the inventory item settings.